What is Git?
Git is a free, open-source version control software. This basically means that Git is a content tracker. So Git can be used to store content — and it is mainly used to store code because of its other features.
Real-life projects generally have multiple developers working in parallel. So they need a version control system like Git to ensure no code conflicts between them.
How It Works
With Git, you record local changes to your code using a command-line tool, called the “Git Shell”. Command-line lets you enter commands to view, change, and manage files and folders in a simple terminal, instead of using a graphical user interface (GUI). If you have not used the command line before, don’t worry, once you get started, it is incredibly straightforward.
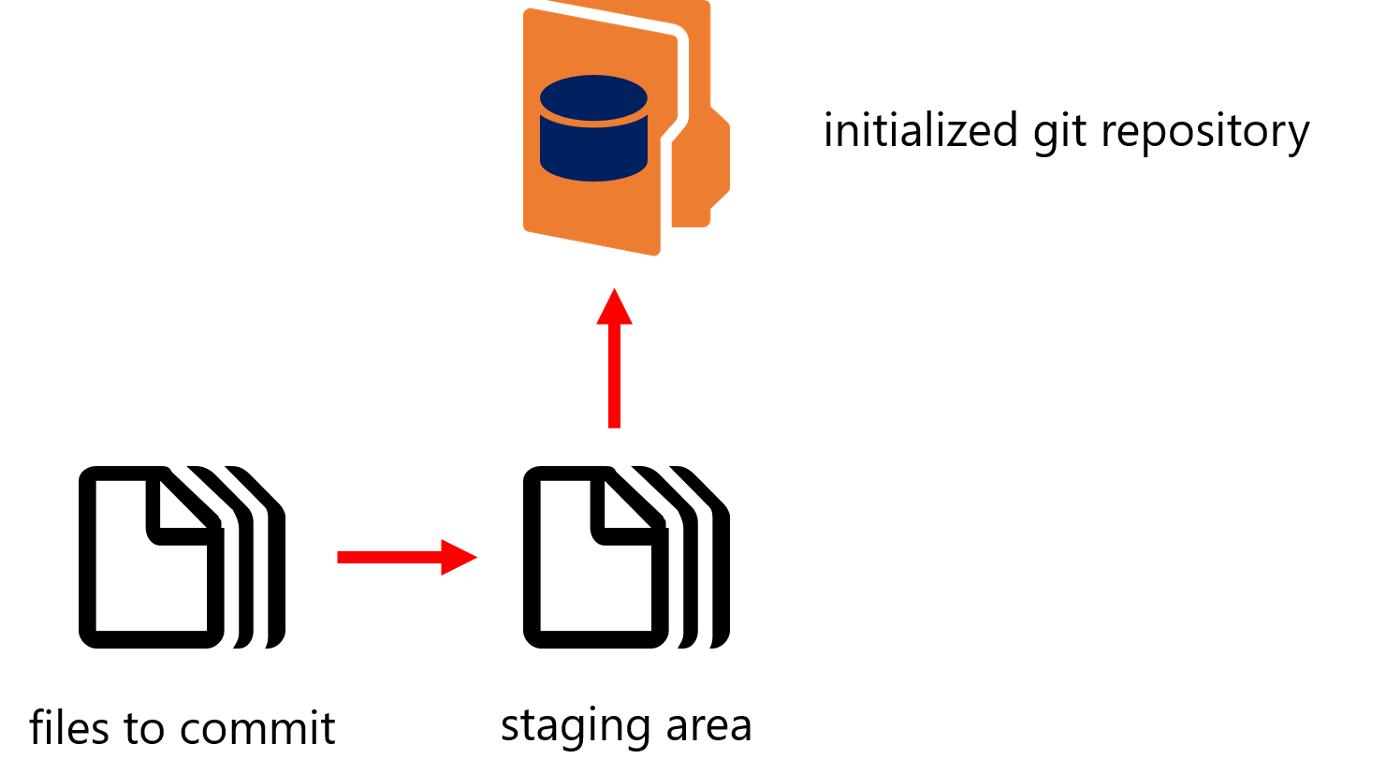
Git Repositories
If we want to start using Git, we need to know where to host our repositories.
A repository (or “Repo” for short) is a project that contains multiple files. In our case, a repository will contain code-based files.
There are three popular Git hosting services: GitHub (owned by Microsoft), GitLab (owned by GitLab), and BitBucket. This blog is regarding Github so we will be using that as our hosting service.
Before using Git we should know why we need it
- Git makes it easy to contribute to open source projects
- Documentation
- Track changes in your code across versions
- Showcase your work
Now we’ll learn how to use Git & GitHub
Make a Github account first to get started 🚀
Git installation
- Goto Git website and download it to your local machine.
Now open Your terminal if you are on Mac or open Git Bash if you are on Windows.
- Verify that Git is installed correctly
$ git --version
- Run the following commands with your information to set a default username and email (same as your Github account) when you’re going to save your work.
$ git config --global user.name "rishabhthakur11"
$ git config --global user.email "example@mail.com"
Creating Github Repositories
There are two ways to work with Github projects
Type 1
First, create the repository, clone it to a PC, and work on it
Create a new repository by clicking the “new repository” button on the GitHub web page.

Pick a name for your first repository, put a small description, check the ‘Initialize this repository with a README’ and click on the “Create repository” button.
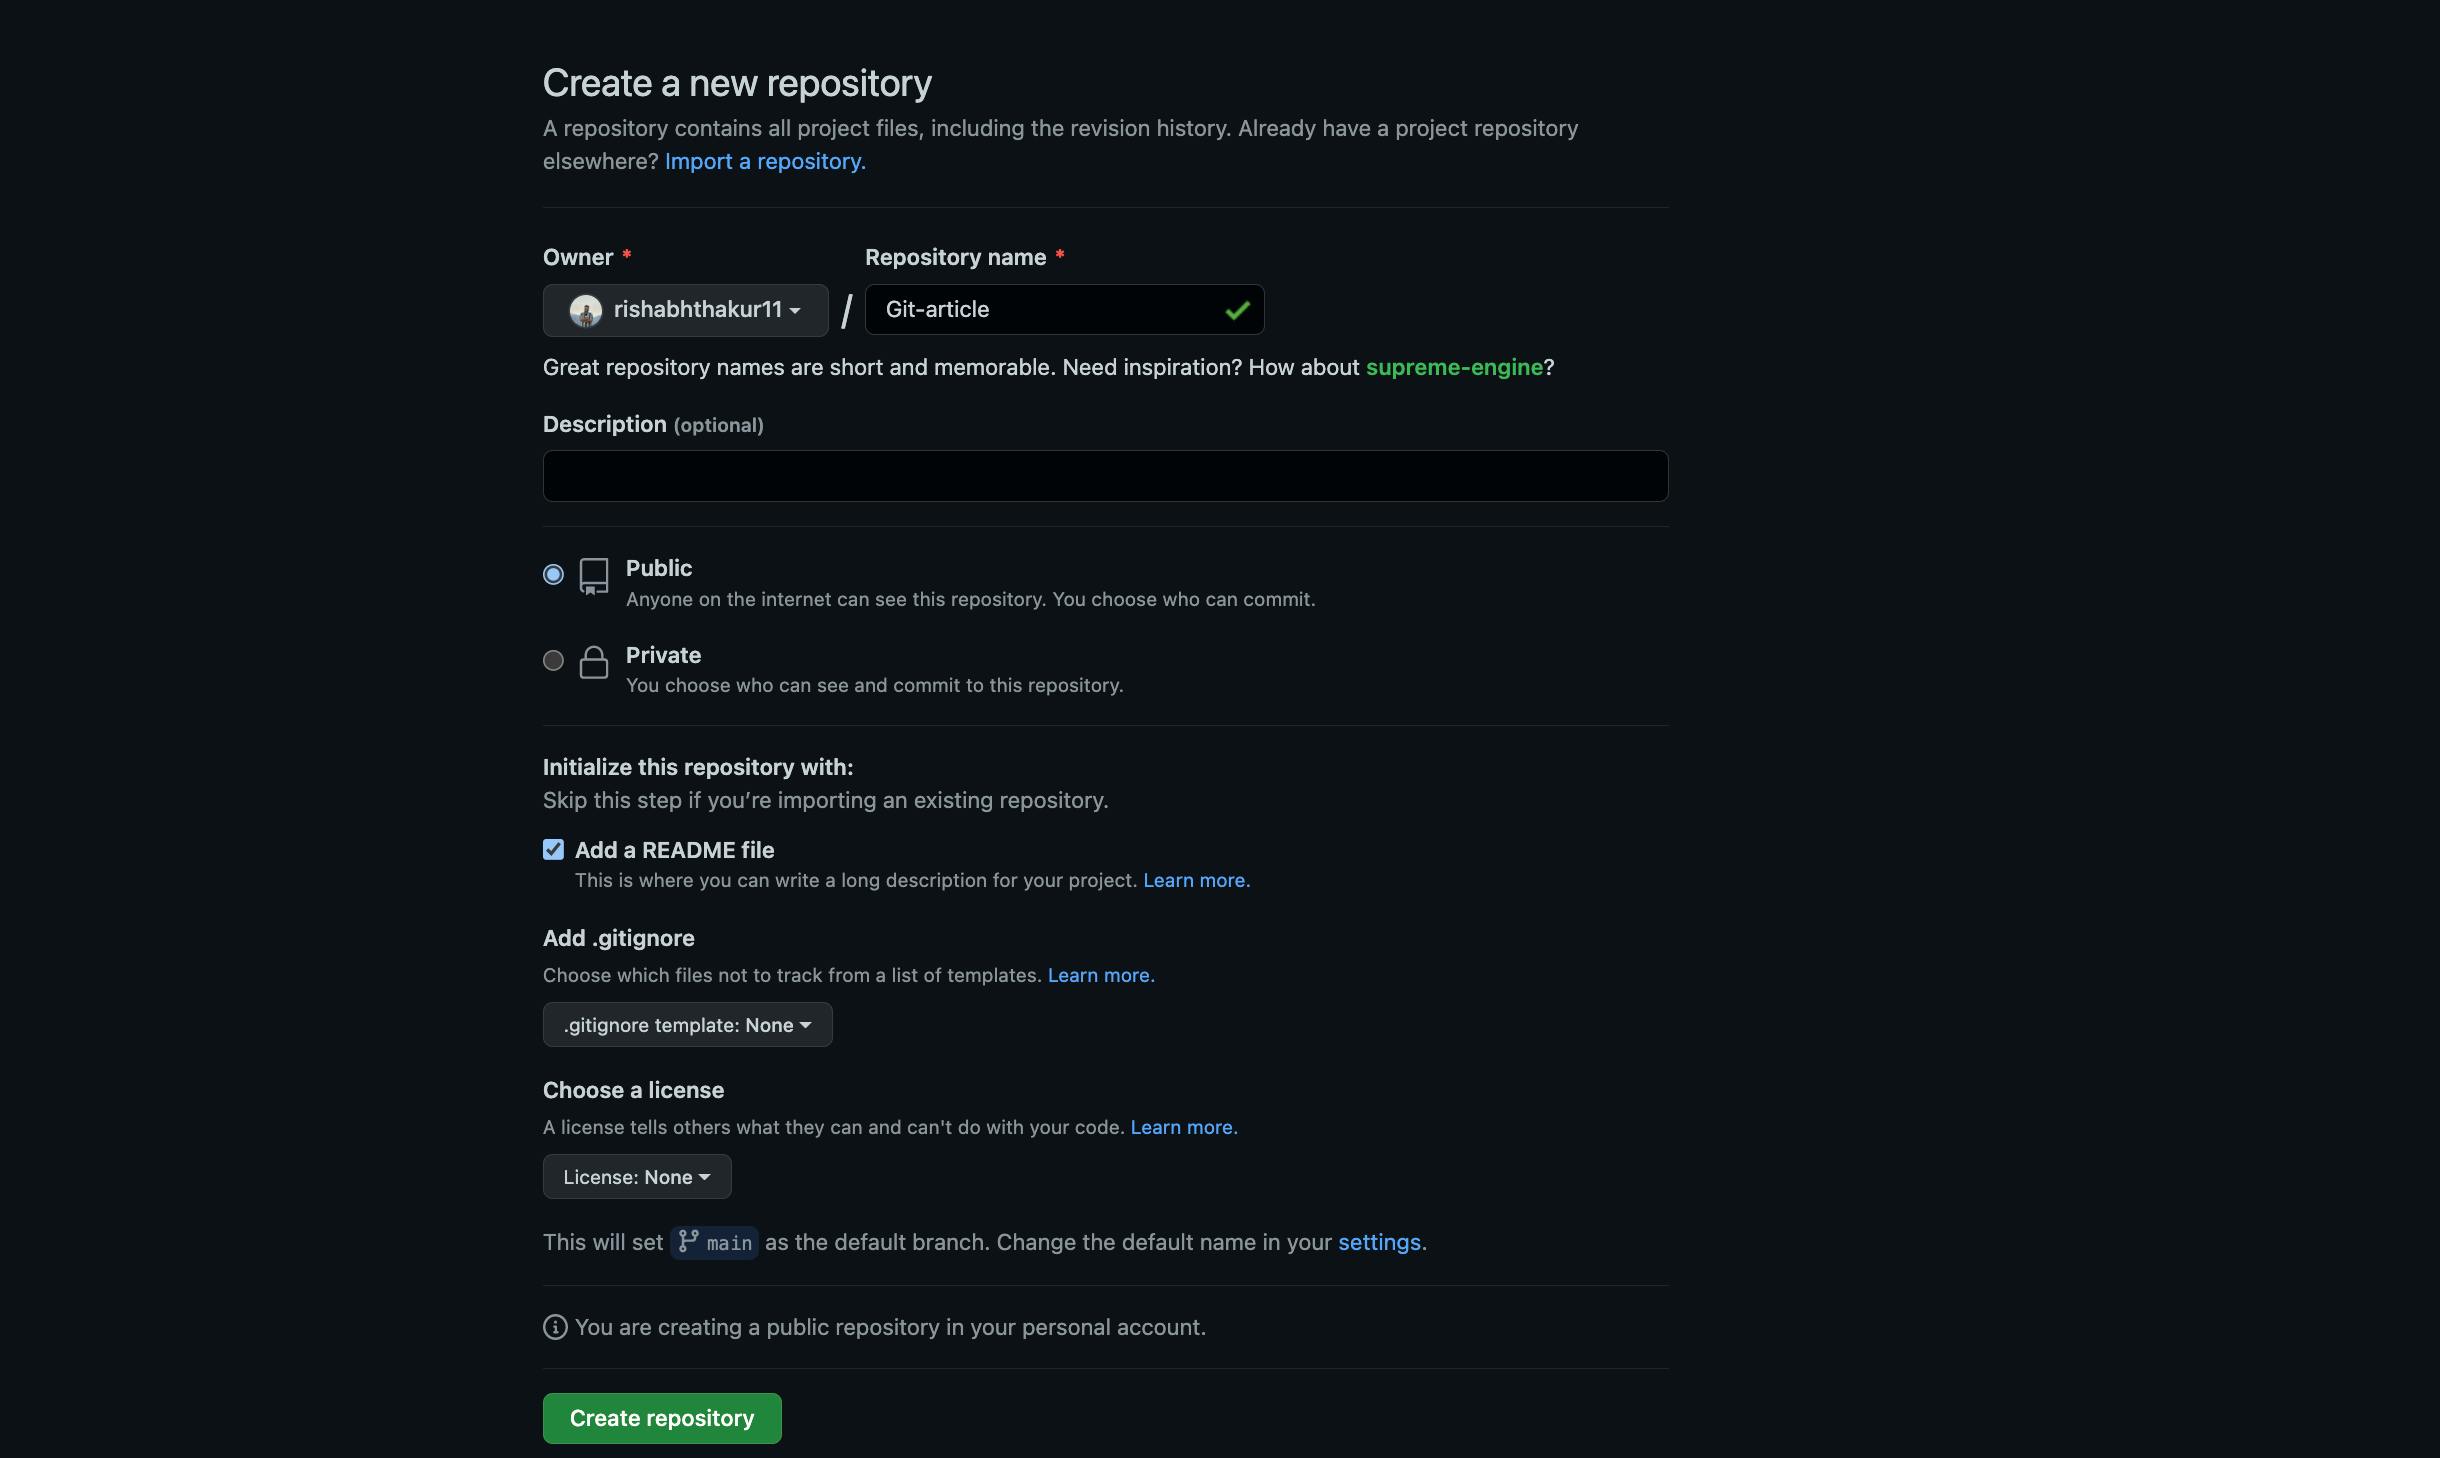
Well done!. Your first GitHub repository is created.
Your first mission is to get a copy of the repository on your computer. To do that, you need to “clone” the repository on your computer. Clone: Taking a repository that’s on the server and cloning it to your computer just like downloading it. On the repository page, you need to get the “HTTPS” address.
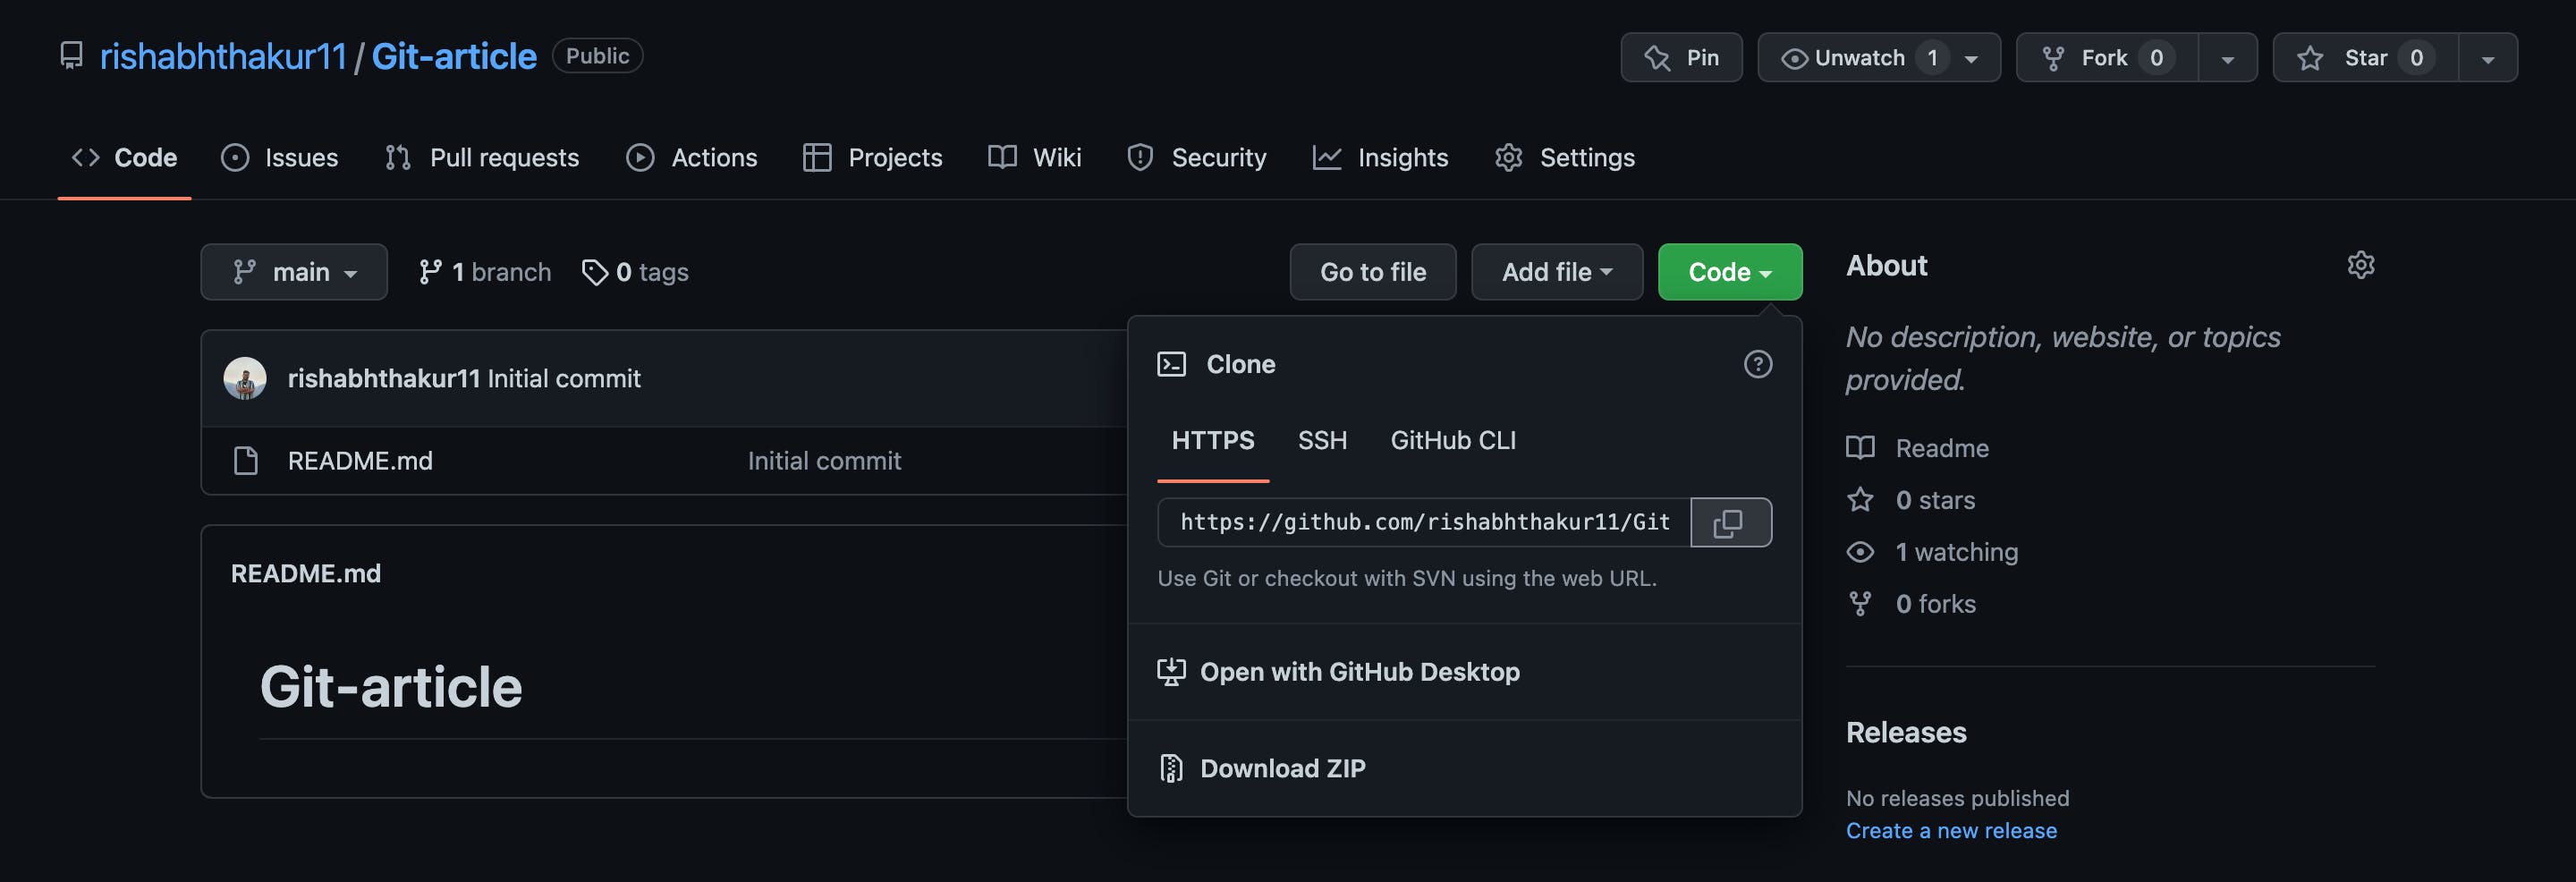
Once you have the address of the repository, you need to use your terminal. Use the following command on your terminal. When you’re ready you can enter.
$ git clone [HTTPS ADDRESS]
This command will make a local copy of the repository hosted at the given address.
Now, in that folder we can create files, work on them and save them locally. To save them in a remote place — GitHub, we have to do a process called “commit”. To do this, get back to your terminal. If you closed it like I previously stated use the ‘cd’ command.
Now, in the terminal, you’re in your repository directory. To “commit”, 4 steps are required. These four steps are called:
- status
- add
- commit
- push
All the following steps must be performed within your project.
- “status”: The first thing you need to do once your work is to check the files you have modified. To do this, you can type the following command to make a list of changes appear.
$ git status
- “add”: With the help of the change list, you can add all files you want to upload with the following command,
$ git add [FILENAME] [FILENAME] [...]
- “commit”: Now that we have added the files of our choice, we need to write a message to explain what we have done. This message may be useful later if we want to check the change history. Here is an example of what we can put in our case.
$ git commit -m "Added sample txt file"
- “push”: Now we can put our work on GitHub. To do that we have to ‘push’ our files to Remote. Remote is a duplicate instance of our repository that lives somewhere else on a remote server. We must know the remote’s name (Mostly remote is named origin). To know that type the following command.
$ git remote
Now we can safely ‘push’ our work by the following command.
$ git push origin master

Type 2
Work on your project locally then create the repository on GitHub and push it to remote.
if you are having your project locally and you wanted to push it to Github follow the steps given below:
- By default, any directory on our computer is not a Git repository but we can turn it into a Git repository by executing the following command in the terminal.
$ git status
- To "add" the file use the following command
$ git add [FILENAME] [FILENAME] [...]
To “add” all of the files in our Repository we can use the following command,
$ git add .
After the staging area(Add process) is complete, we can check whether the files are successfully added or not by executing the $ git status
If those particular files are in green color like the below picture, you’ve done your work!.
- Then we have to “commit” with a description on it.
$ git commit -m "Adding information in contact us page "
NOTE: In Type 2, Please don’t initialize the repository with a README file, when creating a new repository on the GitHub web page.
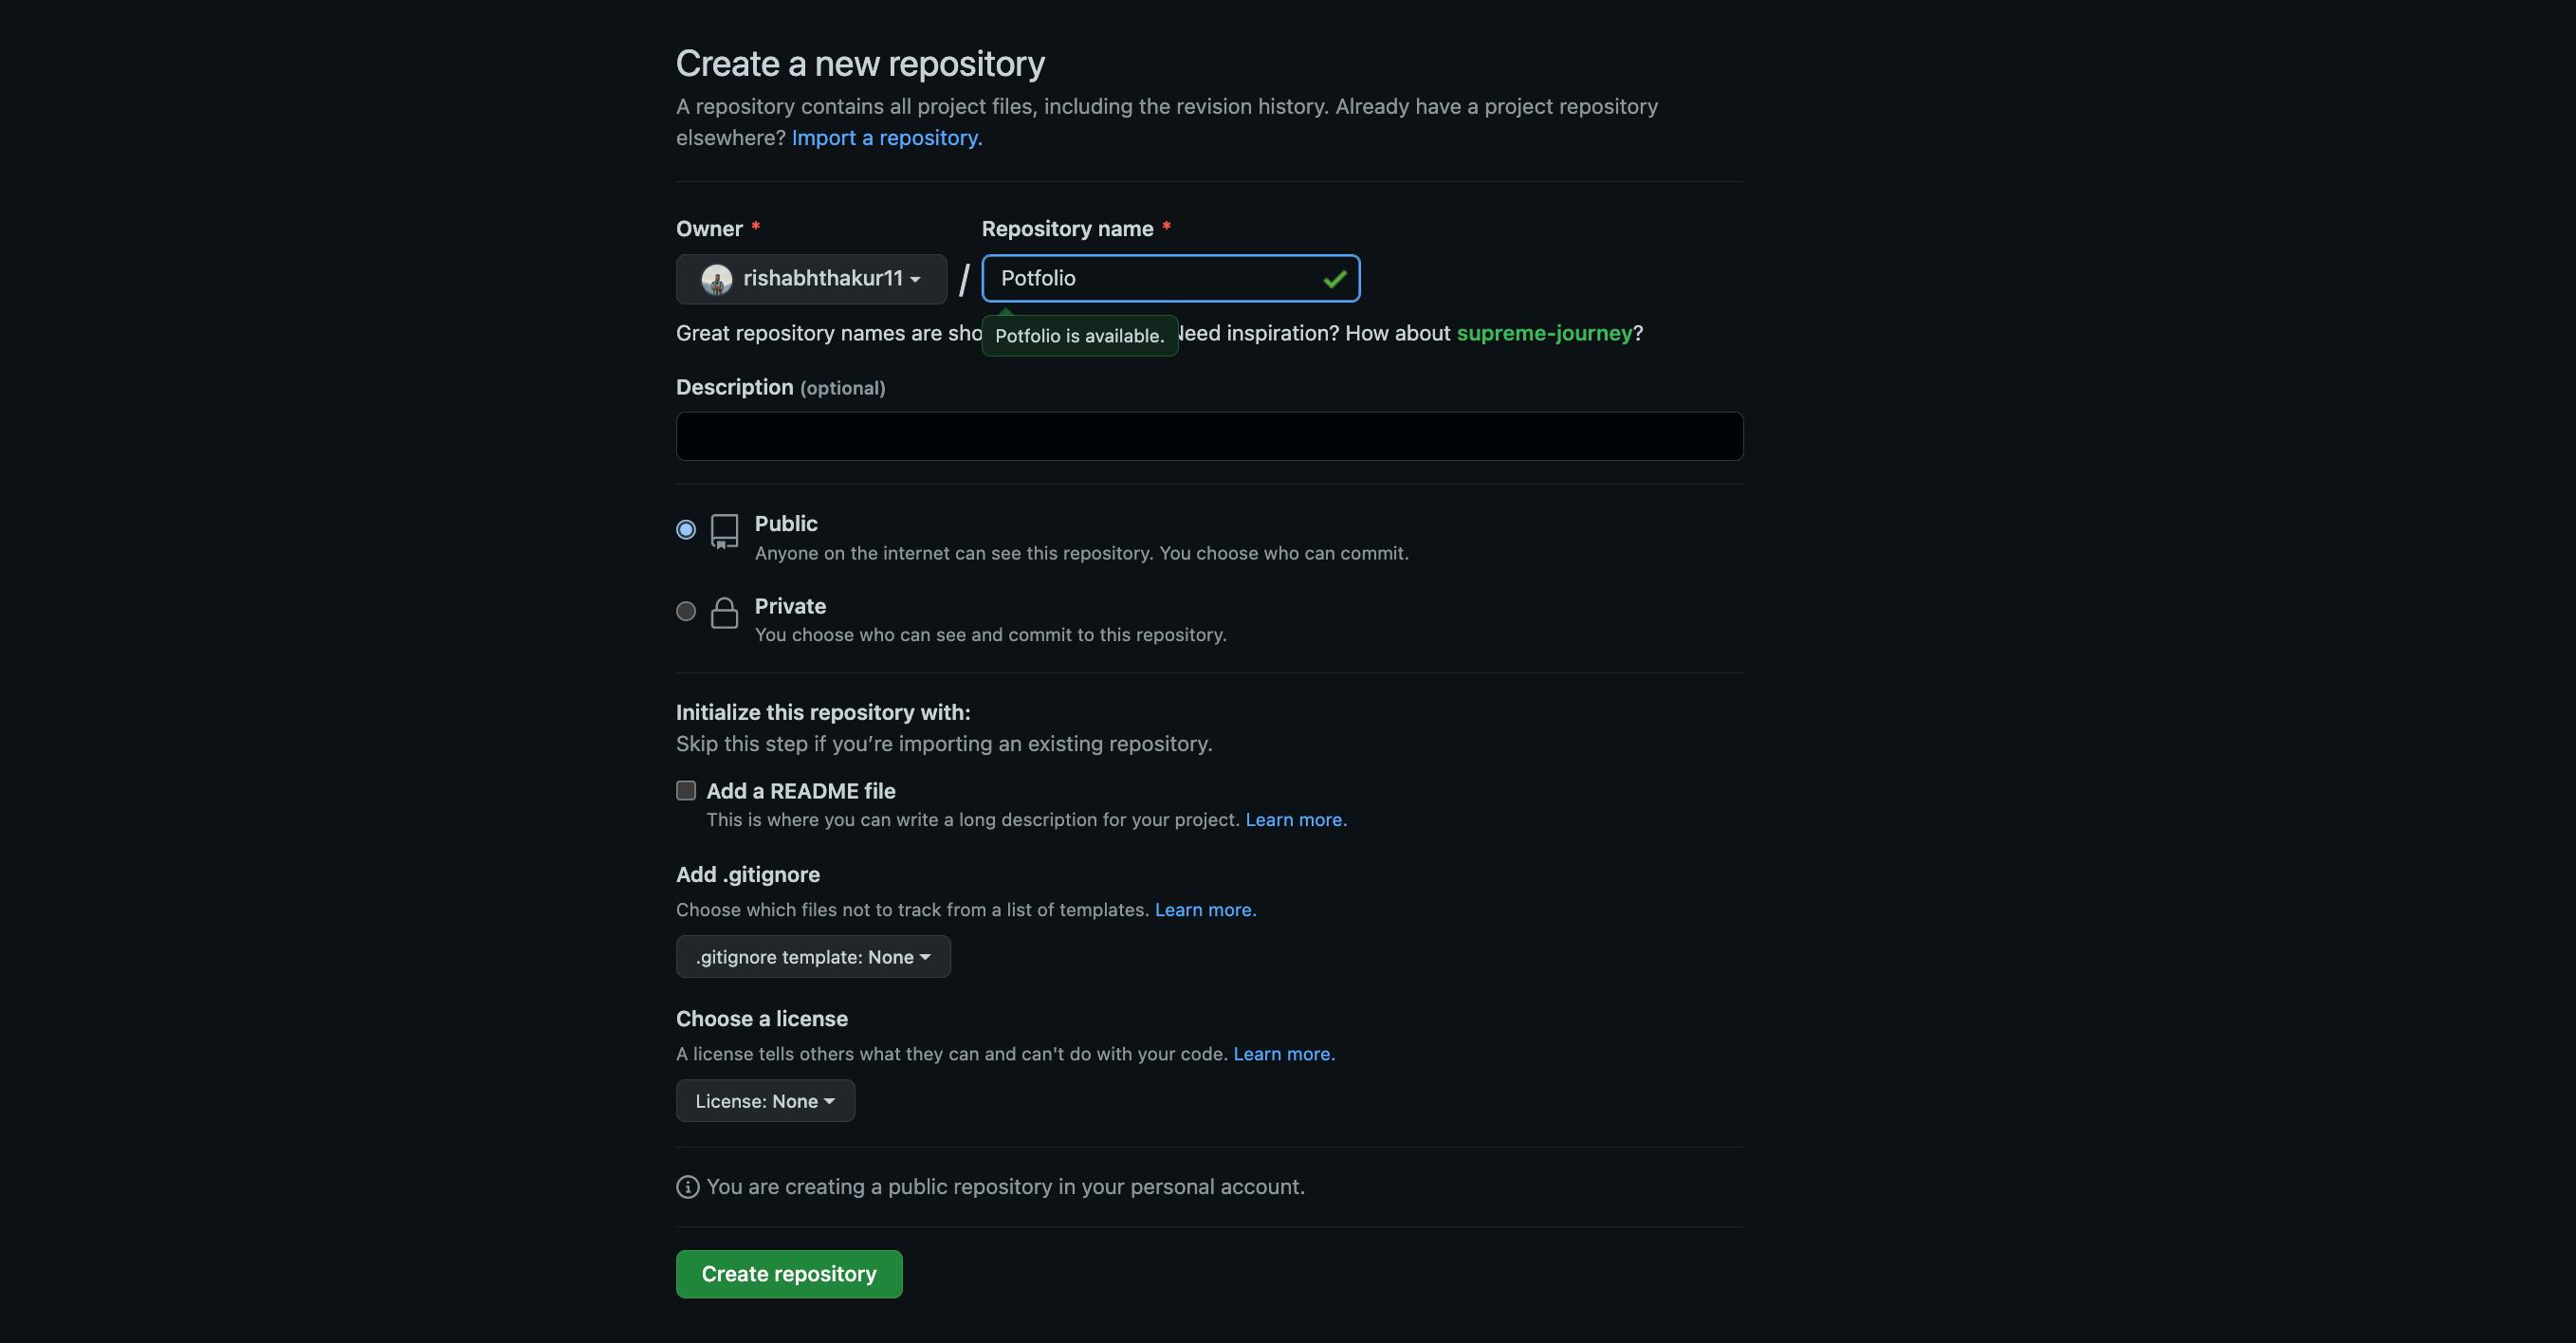
After clicking the “Create repository” button you’ll find the below image as a web page.
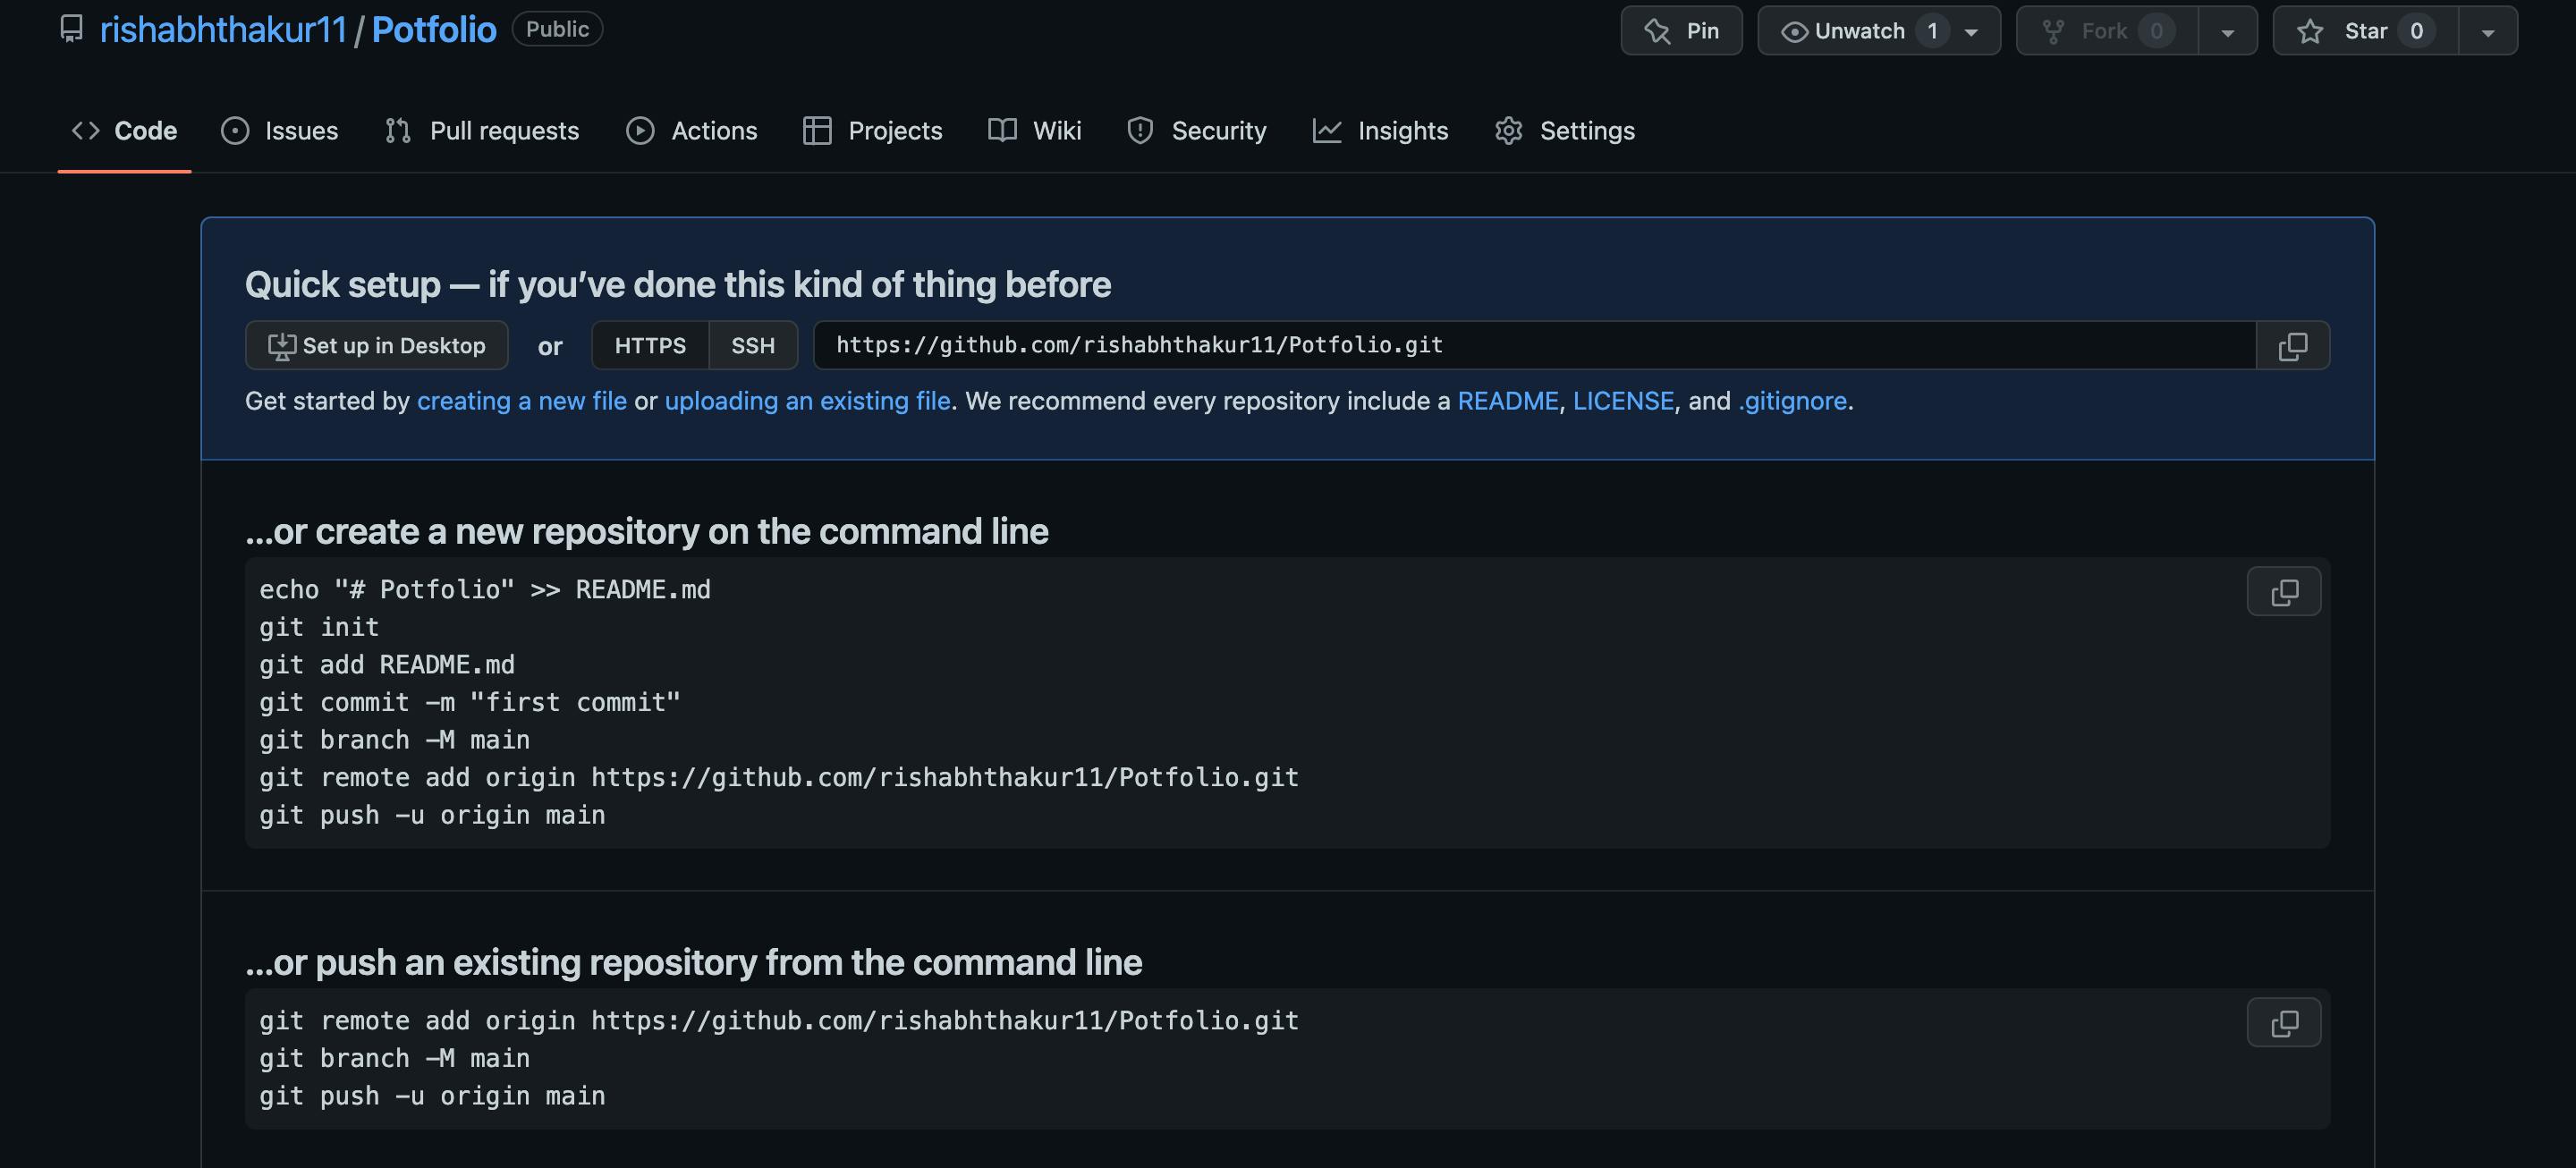
Copy the HTTPS address. Now we’ll create the remote for our repository.
$ git remote add origin [HTTPS ADDRESS]
Now, we can push our project to GitHub without any problem!!
$ git push origin master
Conclusion
So, Thank you everyone for reading. I just explained the basics of Git and GitHub. I strongly encourage you guys to read more related articles on Git and GitHub, you can watch My Video on Git and Github on youtube I hope this article helped you all.
Thank you.
Happy Coding!

