

In this blog, we will learn how to use the JWT token in Nodejs to secure the endpoints and even authenticate users.
What is authentication and authorization
Authentication and authorization are used in security, particularly when getting access to a system. Yet, there is a significant distinction between gaining entry into a house (authentication) and what you can do while inside (authorization).
Authentication
Authentication is the process of verifying a user’s identification by acquiring credentials and using those credentials to confirm the user’s identity. The authorization process begins if the credentials are legitimate. The authorization process always follows the authentication procedure.
Authorization
Authorization allows authenticated users access to resources by determining whether they have system access permissions. By giving or denying specific licenses to an authenticated user, authorization enables you to control access privileges.
What is JWT
JSON Web Tokens (JWT) are an RFC 7519 open industry standard for representing claims between two parties. For example, you can use jwt.io to decode, verify, and produce JWT.
JWT specifies a compact and self-contained method for communicating information as a JSON object between two parties. Because it is signed, this information can be checked and trusted. JWTs can be signed using a secret (using the HMAC algorithm) or an RSA or ECDSA public/private key combination. In a moment, we’ll see some examples of how to use them.
Prerequisites
- A working knowledge of JavaScript.
- A good understanding of Node.js.
- A basic understanding of MongoDB or any database of your choice.
- Postman and some knowledge of how to use Postman.
API development using JWT token for authentication in Node.js
To get started, we’ll need to set up our project.
Step 1 - Create a directory and initialize npm
- Windows power shell
mkdir auth-project

cd auth-project

npm init -y
- Linux
mkdir auth-project

cd auth-project

npm init -y
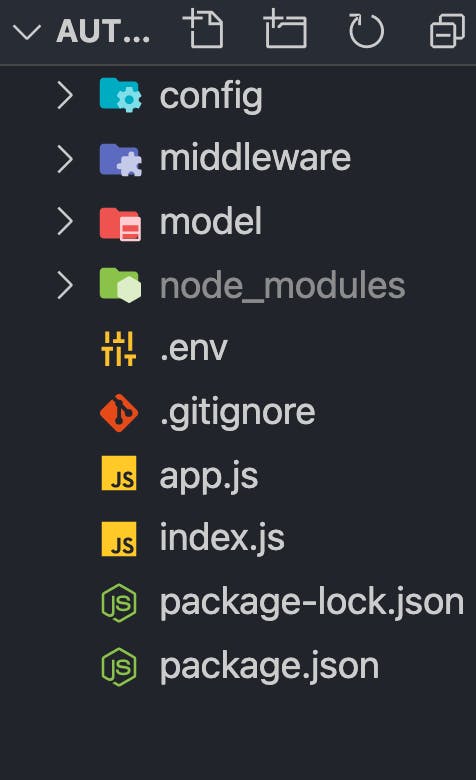
Step 2 - Create files and directories
In step 1, we initialized npm with the command npm init -y, which automatically created a package.json.
We need to create the model, middleware, config directory, and their files, for example, user.js,auth.js,database.js using the commands below.
mkdir model middleware config

touch config/database.js middleware/auth.js model/user.js
We can now create the index.js and app.js files in the root directory of our project with the command.
touch app.js index.js
Step 3 - Install dependencies
We’ll install several dependencies like mongoose, jsonwebtoken, express dotenv bcryptjs and development dependency like nodemon to restart the server as we make changes automatically.
We will install mongoose because I will be using MongoDB in this tutorial.
We will validate user credentials against what we have in our database. So the whole authentication process is not limited to the database we’ll be using in this article.
npm install mongoose express jsonwebtoken dotenv bcryptjs

npm install nodemon -D
Step 4 - Create a Node.js server and connect your database
Now, let’s create our Node.js server and connect our database by adding the following snippets to your app.js, index.js , database.js .env in that order.
In our database.js.
config/database.js:
const mongoose = require("mongoose");
const { MONGO_URI } = process.env;

exports.connect = () => {
  // connecting to database
  mongoose
    .connect(MONGO_URI, {
      useNewUrlParser: true,
      useUnifiedTopology: true,
    })
    .then(() => {
      console.log("Successfully connected to database");
    })
    .catch((error) => {
      console.log("database connection failed. exiting now...");
      console.error(error);
      process.exit(1);
    });
};
In our app.js:
auth-project/app.js
require("dotenv").config();
require("./config/database").connect();
const express = require("express");

const app = express();

app.use(express.json());

// Logic goes here

module.exports = app;
In our index.js:
auth-project/index.js
const http = require("http");
const app = require("./app");
const { API_PORT } = process.env;
const port = process.env.PORT || API_PORT;

// server listening
app.listen(port, () => {
  console.log(`Server running on port ${port}`);
});
If you notice, our file needs some environment variables. You can create a new .env file if you haven’t and add your variables before starting our application.
In our .env.
API_PORT=4001

MONGO_URI= //Your database URI here
To start our server, edit the scripts object in our package.json to look like the one shown below.
"scripts": {
    "start": "node index.js",
    "dev": "nodemon index.js",
    "test": "echo \"Error: no test specified\" && exit 1"
  }
The snippet above has been successfully inserted into app.js, index.js, and database.js. First, we built our node.js server in index.js and imported the app.js file with routes configured.
Then, as indicated in database.js, we used mongoose to create a connection to our database.
Execute the command npm run dev.
Both the server and the database should be up and running without crashing.
Step 5 - Create user model and route
We’ll define our schema for the user details when signing up for the first time and validate them against the saved credentials when logging in.
Add the following snippet to user.js inside the model folder.
model/user.js
const mongoose = require("mongoose");

const userSchema = new mongoose.Schema({
  first_name: { type: String, default: null },
  last_name: { type: String, default: null },
  email: { type: String, unique: true },
  password: { type: String },
  token: { type: String },
});
module.exports = mongoose.model("user", userSchema);
Now let’s create the routes for register and login, respectively.
In app.js in the root directory, add the following snippet for the registration and login.
app.js
// importing user context
const User = require("./model/user");

// Register
app.post("/register", (req, res) => {
// our register logic goes here...
});

// Login
app.post("/login", (req, res) => {
// our login logic goes here
});
Step 6 - Implement register and login functionality
We’ll be implementing these two routes in our application. We will be using JWT to sign the credentials and bycrypt to encrypt the password before storing them in our database.
From the /register route, we will:
- Get user input.
- Validate user input.
- Validate if the user already exists.
- Encrypt the user password.
- Create a user in our database.
- And finally, create a signed JWT token.
Modify the /register route structure we created earlier to look as shown below.
app.js
// ...
const jwt = require("jsonwebtoken");
const bcrypt = require("bcryptjs");
const User = require("./model/user");

app.post("/register", async (req, res) => {

  // Our register logic starts here
  try {
    // Get user input
    const { first_name, last_name, email, password } = req.body;

    // Validate user input
    if (!(email && password && first_name && last_name)) {
      res.status(400).send("All input is required");
    }

    // check if user already exist
    // Validate if user exist in our database
    const oldUser = await User.findOne({ email });

    if (oldUser) {
      return res.status(409).send("User Already Exist. Please Login");
    }

    //Encrypt user password
    encryptedPassword = await bcrypt.hash(password, 10);

    // Create user in our database
    const user = await User.create({
      first_name,
      last_name,
      email: email.toLowerCase(), // sanitize: convert email to lowercase
      password: encryptedPassword,
    });

    // Create token
    const token = jwt.sign(
      { user_id: user._id, email },
      process.env.TOKEN_KEY,
      {
        expiresIn: "2h",
      }
    );
    // save user token
    user.token = token;

    // return new user
    res.status(201).json(user);
  } catch (err) {
    console.log(err);
  }
  // Our register logic ends here
});

// ...
Note: Update your .env file with a TOKEN_KEY, which can be a random string.
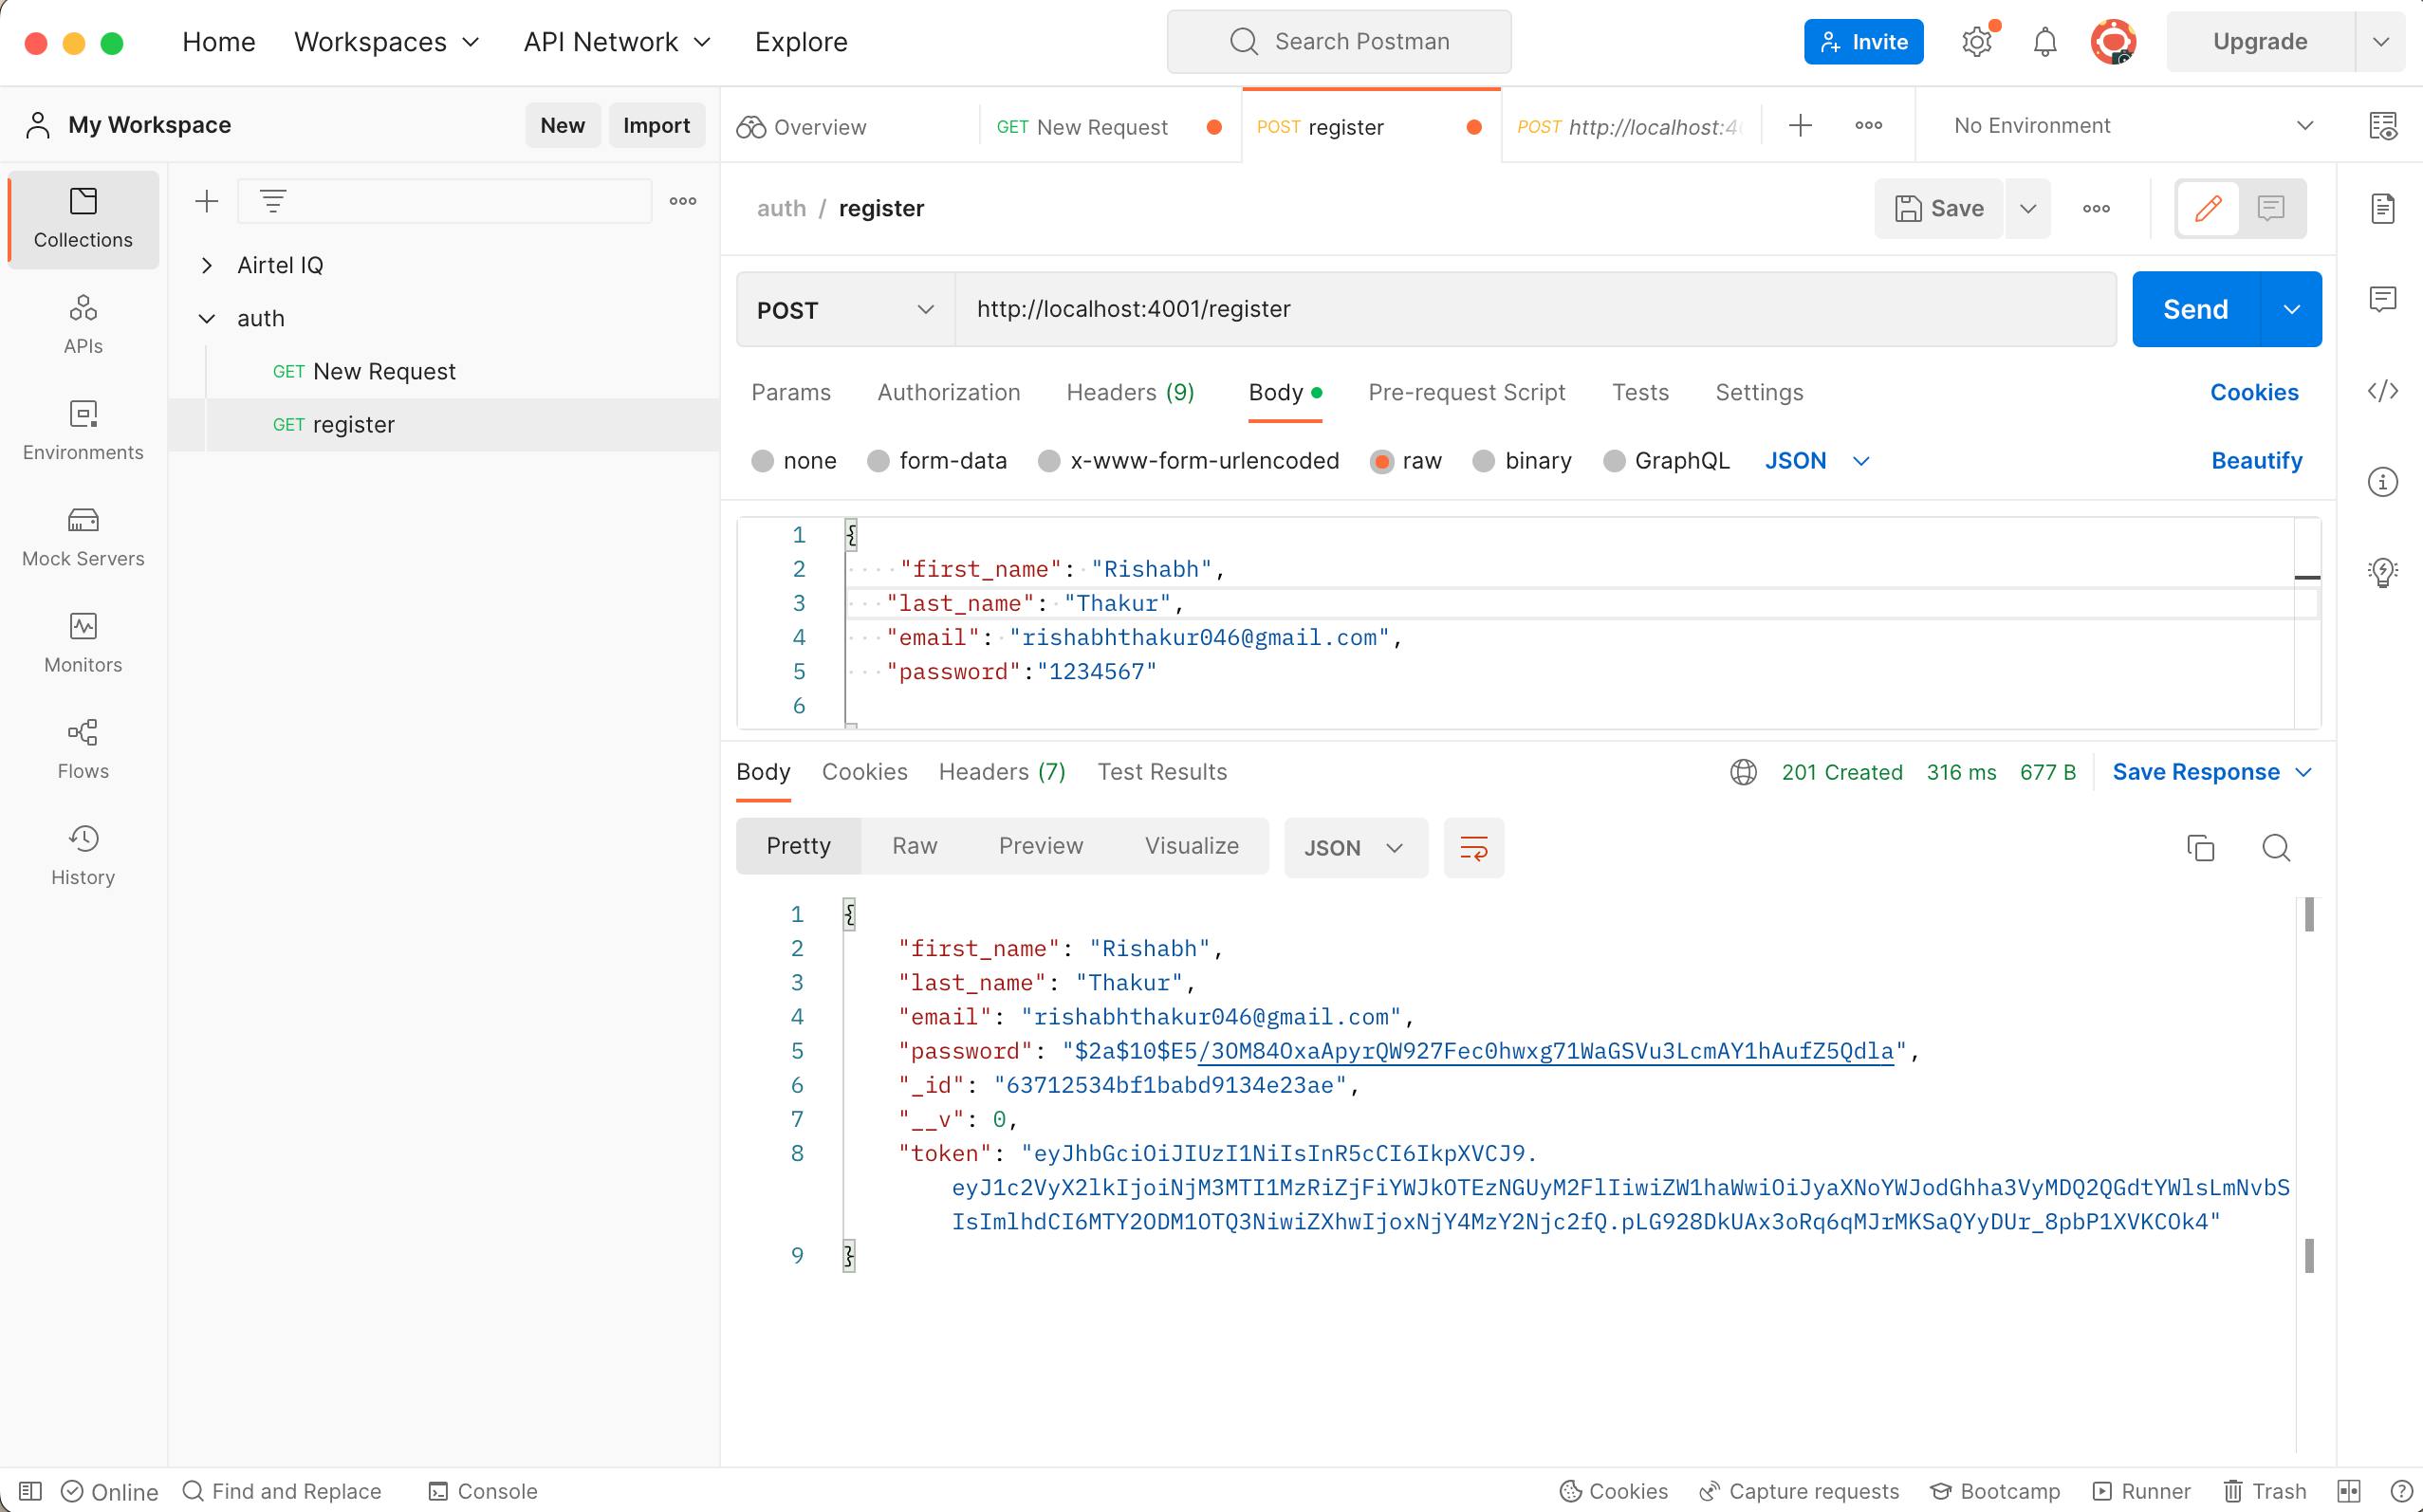
Using Postman to test the endpoint, we’ll get the response shown below after successful registration.
For the /login route, we will:
- Get user input.
- Validate user input.
- Validate if the user exists.
- Verify user password against the password we saved earlier in our database.
- And finally, create a signed JWT token. Modify the /login route structure we created earlier to look like shown below.
// ...

app.post("/login", async (req, res) => {

  // Our login logic starts here
  try {
    // Get user input
    const { email, password } = req.body;

    // Validate user input
    if (!(email && password)) {
      res.status(400).send("All input is required");
    }
    // Validate if user exist in our database
    const user = await User.findOne({ email });

    if (user && (await bcrypt.compare(password, user.password))) {
      // Create token
      const token = jwt.sign(
        { user_id: user._id, email },
        process.env.TOKEN_KEY,
        {
          expiresIn: "2h",
        }
      );

      // save user token
      user.token = token;

      // user
      res.status(200).json(user);
    }
    res.status(400).send("Invalid Credentials");
  } catch (err) {
    console.log(err);
  }
  // Our register logic ends here
});

// ...
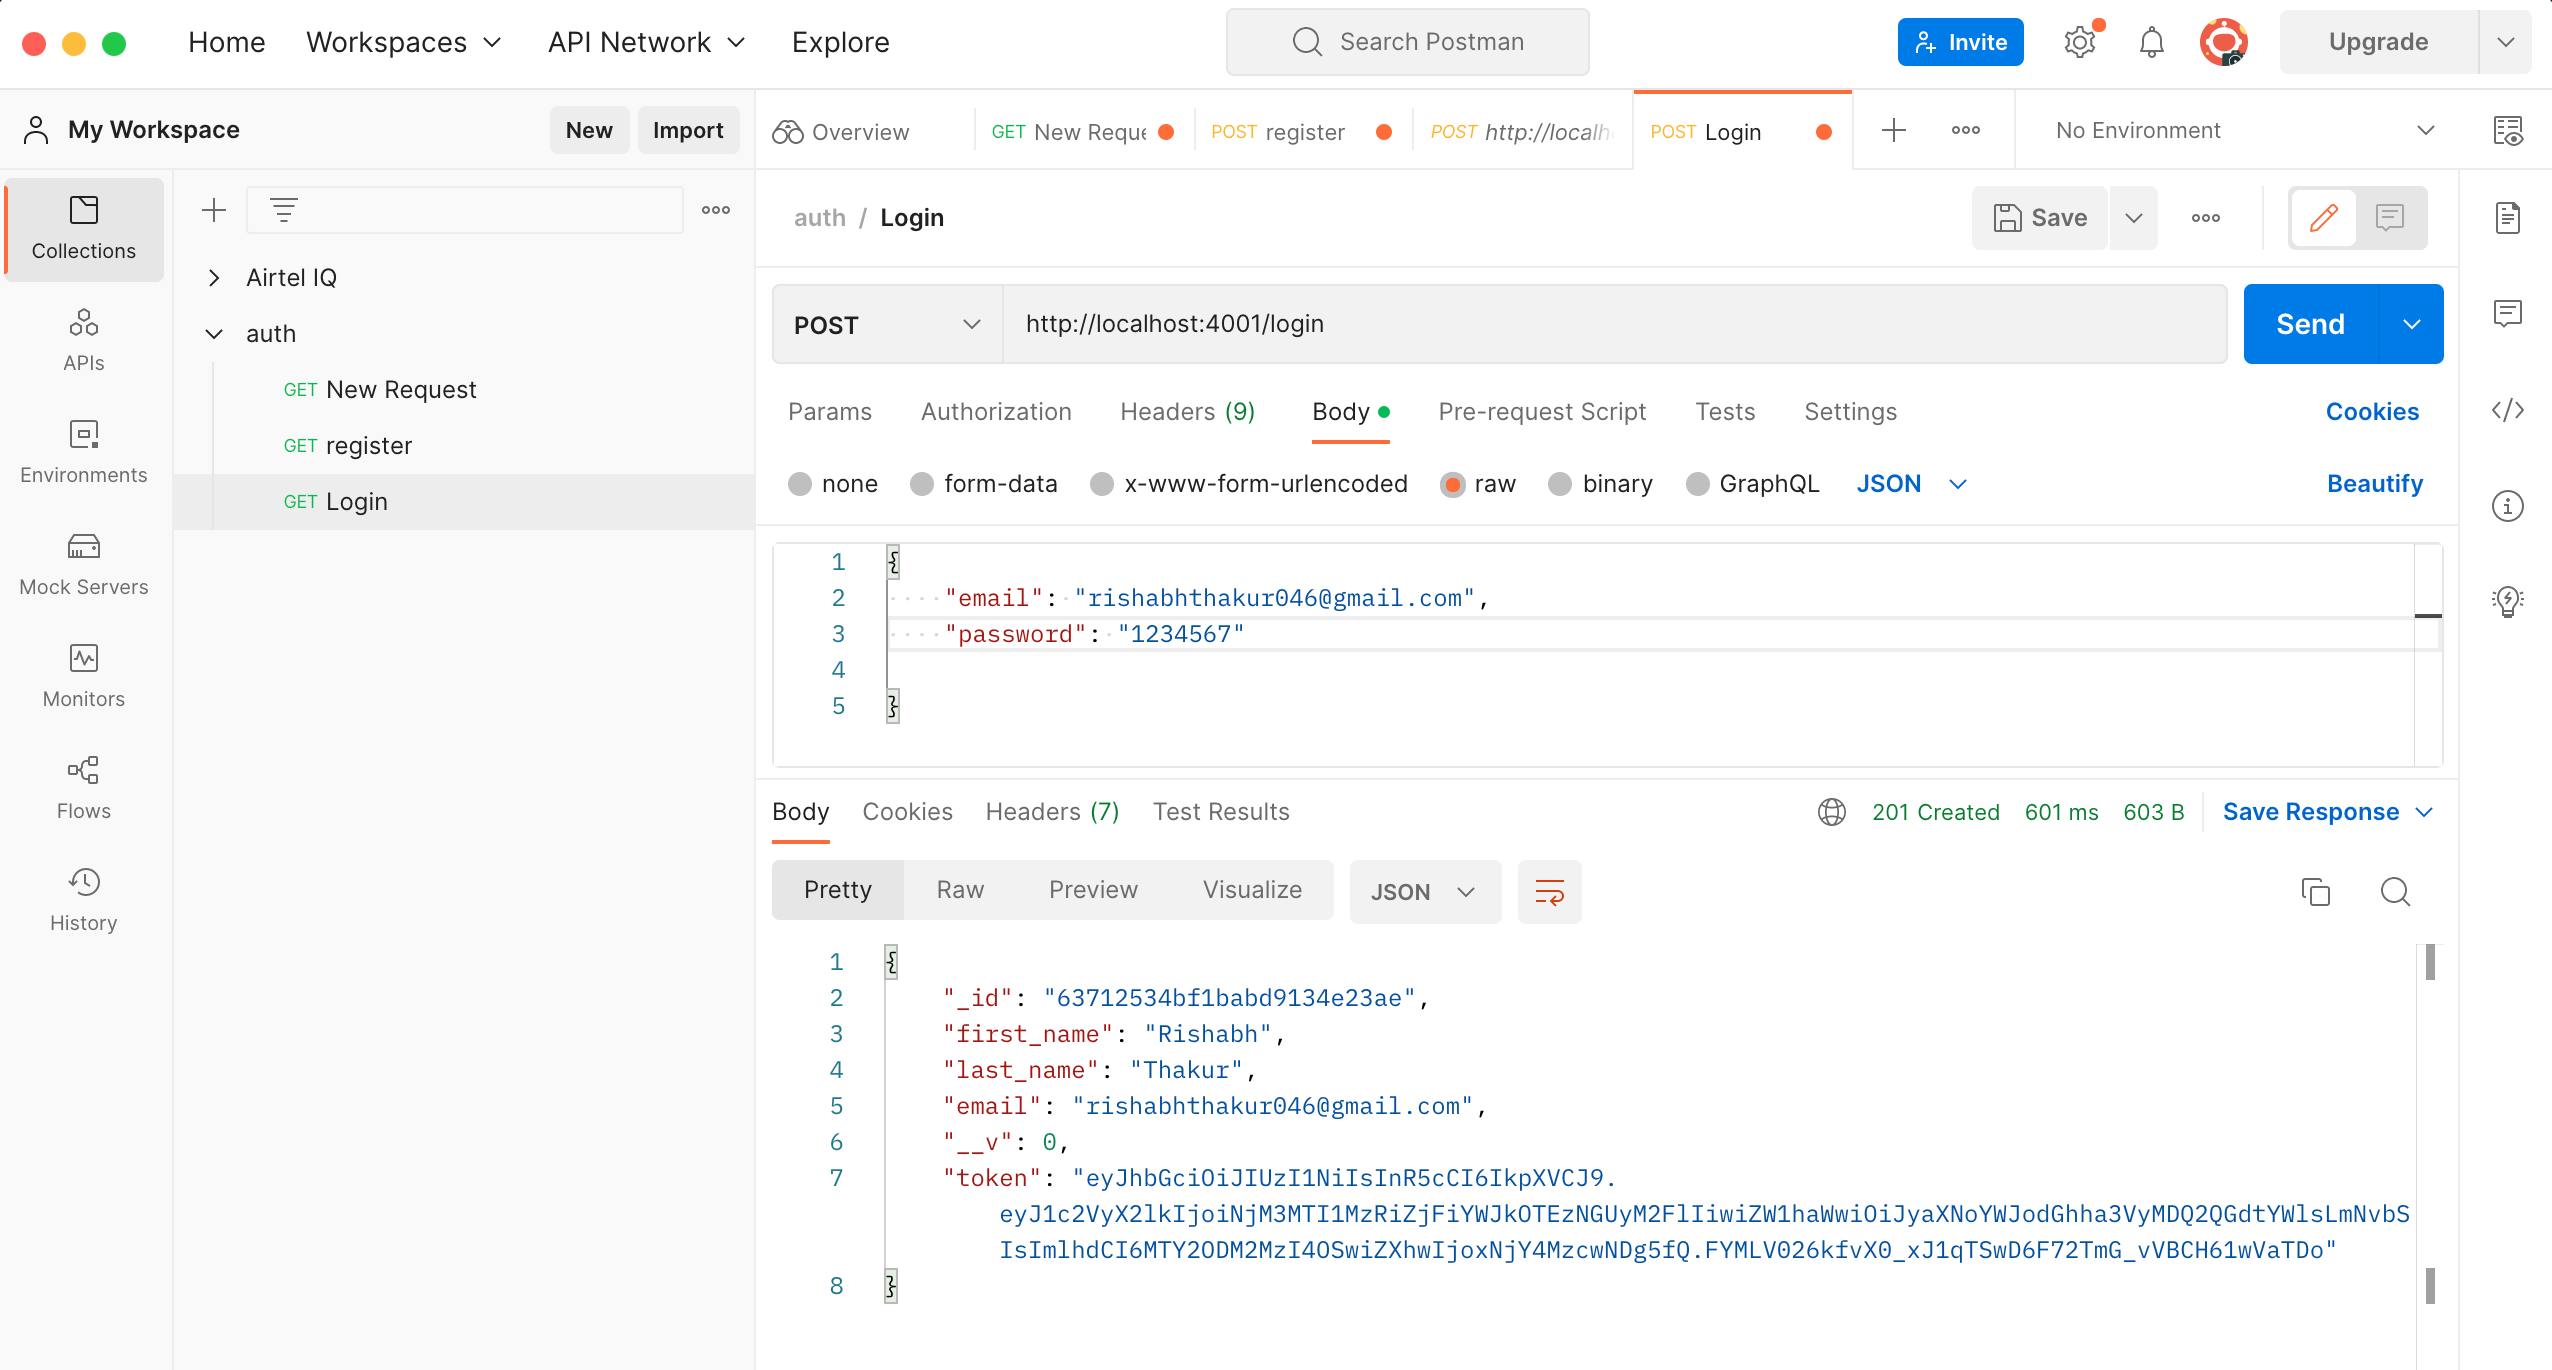
Using Postman to test, we’ll get the response shown below after a successful login.
Step 7 - Create middleware for authentication
We can successfully create and log in a user. Still, we’ll create a route that requires a user token in the header, which is the JWT token we generated earlier.
Add the following snippet inside auth.js.
middleware/auth.js
const jwt = require("jsonwebtoken");

const config = process.env;

const verifyToken = (req, res, next) => {
  const token =
    req.body.token || req.query.token || req.headers["x-access-token"];

  if (!token) {
    return res.status(403).send("A token is required for authentication");
  }
  try {
    const decoded = jwt.verify(token, config.TOKEN_KEY);
    req.user = decoded;
  } catch (err) {
    return res.status(401).send("Invalid Token");
  }
  return next();
};

module.exports = verifyToken;
Now let’s create the /welcome route and update app.js with the following snippet to test the middleware.
app.js
const auth = require("./middleware/auth");

app.post("/welcome", auth, (req, res) => {
  res.status(200).send("Welcome 🙌 ");
});
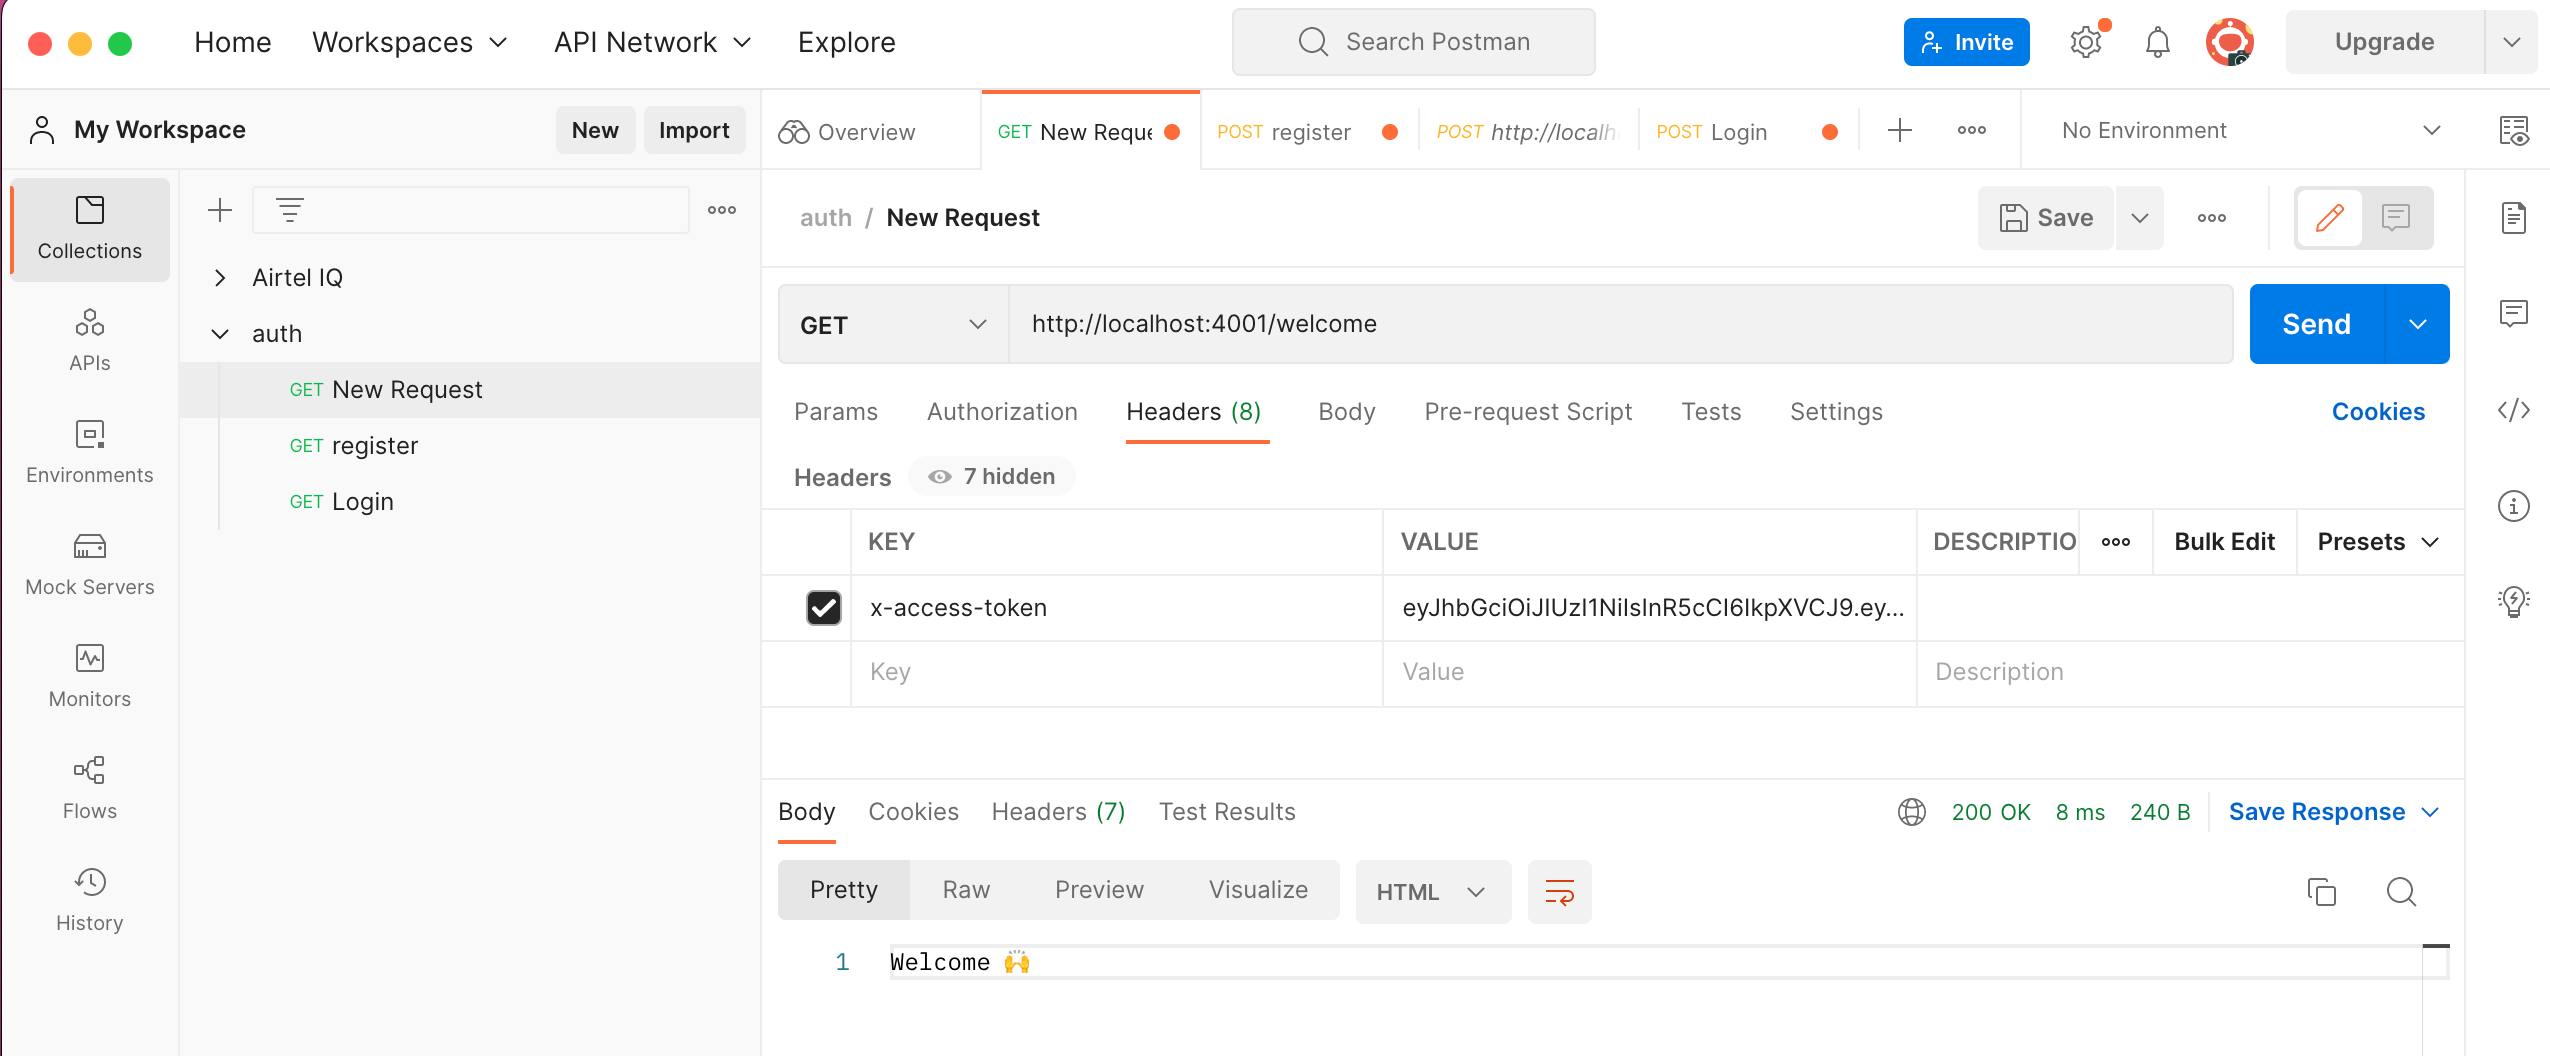
See the result below when we try to access the /welcome route we just created without passing a token in the header with the x-access-token key.
We can now add a token in the header with the key x-access-token and re-test.
See the image below for the response.
You can click here to check the complete code on GitHub.
Conclusion
In this tutorial, we learned about JWT, authentication, authorization, and how to develop an API using a JWT token for authentication in Node.js.
Happy coding! Hit a like and share if you found it useful.